For those of you who spend hours trying to convert a photograph into a full-colour drawing - just simply download Akvis Sketch application and do the conversion in just a few easy clicks. It's fun and it's free!!!
Monday, 15 December 2008
Use Akvis Sketch to convert a photograph into a full-colour drawing
For those of you who spend hours trying to convert a photograph into a full-colour drawing - just simply download Akvis Sketch application and do the conversion in just a few easy clicks. It's fun and it's free!!!

Download Flash Elements
 Driven by ambition of having professionally looking website and a chronic lack of time I decided to use a navigation bar downloaded from a FlashDen.net website. And it is not to say that I cannot create one by myself but to hint towards the fact that professional web developers often use this type of services to save time for other things. Why would one want to invent a wheel again?
I have paid to download a two level navigation bar but I found it difficult to understand the way it can be edited (fonts, colour, etc.) and actually used on my flash stage. And well, after hours wasted trying to solve the problem independently and another couple of hours with the tutor's (Maria) help the bar was fixed and ready to use. Well done to all involved...
To see the original navigation bar preview click here.
Thursday, 11 December 2008
Watch out: Flash CS4 only for the courageous!

After I bought my new Macbook and decided to equip it with Adobe software and this was the time when I realized that Adobe has already launched a new version - CS4. I thought: 'Well..., this is an investment in future. Sooner or later everybody will update to the newer version and I will be already familiar with it. And, how much difference working on a newer version of Flash will make to me - I am nearly an expert anyway'. I could not be more mistaken!
Making the simplest animation such as a shape moving from left to the right, fading in or out did not work. Why??? Why??? Why??? - I kept banging my head against the wall.
For those of you who are ever going to upgrade to Flash CS4: do not create a new keyframe for animations, Flash will make it for you. Look up at these Kirupa tutorials.
Conclusion
This tutorial was a broad overview of some of the animation features you have in Flash CS4. If you are familiar with previous versions of Flash, none of the terminology in here was particularly new. What was new is how you actually created your animation.
In the past, you had an instance of your object at your starting point and another instance of your object at the end point. You also inserted two keyframes to represent that. The tweening system calculated the differences between those two objects and presented them to you.
By default, animations you now create in Flash CS4 are property-based where the properties of your object are modified over a period of time. You have the same object throughout the lifespan of your tween, and at various points in time, the properties that make up your object are altered instead of the actual object itself. In our example, it was our image's X and Alpha properties that were changed over a period of time. That seems trivial and the end result doesn't look dramatically different, but this is a major change that this tutorial does not even attempt to address.
Future tutorials will focus on that change and other parts of the animation functionality in CS4, so with that, here is the source file for the animation you just created:
Wednesday, 10 December 2008
Free photo library


I just found an amazing site with fantastic images in print quality. All free and available for all sort of publications. No fees, no copyright!!! You even find photo-tips and Photoshop tutorials. All you need to do is register. Highly recommended!
Business Card Design
 Last night I have come up with a business card design. It is rather simple - I know - but than I want to use this card in real world. After graduation I might be doing some journalism freelancing and I will need a business card so I plan to use this one. It is simple but simple does not mean bad, does it? I think it looks quite professional.
There is another, slightly different version. It is still subject to change. Feedback and suggestions appreciated.
Tuesday, 9 December 2008
Removing background with a doctor's precision
After hours and hours of trying to remove the green screen background from my photo session pictures using the hit-and-try method I managed to develop the procedure that seems to work. It also seems to be very complicated but I really cannot think of any other way to do it. Once I've done few pics I think it still is laborious and time-consuming but also doable.
This is the procedure:
- Open the picture in AfterEffects, shorten the timeline to 1 frame only and remove background using Effects-Keying-Keylight. Change the screen color to white, adjust picture grain and balance.
- Export the image as png file (not jpeg, for some reason if exported as jpeg the background remains black while if exported as png the background turns light grey).
- Open file in preview (again if you simply open it in Photoshop the background goes black again) and save as jpeg.
- Then the jpeg file is ready to be edited in Photoshop. Remove the background completely using magic or quick selection tool.
- Once the background is transparent save as psd file and jpeg file (you will need to overwrite the previous jpeg picture if saved with the same name - it is not needed anymore and saving all format off the same picture with the same name will help to keep the files organized).
Monday, 8 December 2008
Poster Design
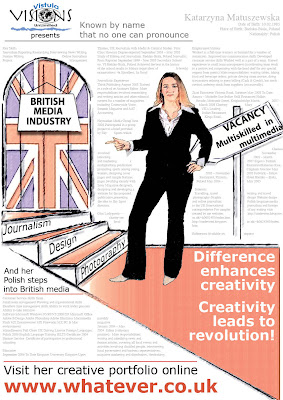
I have spent the last couple of days designing a poster for my project. Despite the extensive experience in InDesign I posses I still found it extremely difficult and time-consuming.
I also find having to work on the images of myself a little bit intimidating. I feel like I lose the sense of visual objectivity when I work with my own images. It just feel so strange...
Anyways, due to my other university
commitments I had very little time to work on my project lately and today I had to show my work in progress to the rest of the class. I did not have much so having design the poster that was the most important part of my presentation.
I think that in overall Maria liked the poster but she suggested the the picture of me being close to the original image and simply pasted into the poster drawings of stairs and doors looked a bit out of place. I do agree with that comment and I was looking for a way to adjust the picture so it look like drawing too and is consistent throughout.
I have tried different filters in Photoshop and InDesign but nothing
seemed to work. I thought I have to find an alternative so I googled for tutorials on how to convert a photograph into a color drawing. I found something called Akvis Sketch. I have never heard of this software before but it looked pretty straight forward, easy-to-use and effective way of converting the image so I gave it a go and downloaded it.
Here is a corrected version of the poster. I believe I will still need to change it later as it should include the module name and code but I will leave it for later stage of production processes.
Subscribe to:
Posts (Atom)